Adding Backbone.js to an Existing Rails App, Part 1
Editor’s note: This tutorial assumes a basic comfortability with basic Rails concepts, as well as running tasks on the command line. An understanding of jQuery is helpful, and while CoffeeScript knowledge isn’t absolutely mandatory, not having a strong aversion to it would be beneficial. This is part one of the tutorial. You can find part two here.
Since the dawn of the rise of front-end JavaScript frameworks, much of the user interface on modern websites has been handled on the client. Single-page applications have become widespread, and users have come to expect a richer, more desktop-like experience. Increasingly, rendering templates on the server and re-rendering the whole page with each request has come to feel slow.
Web frameworks like Rails can make developing API-driven JavaScript-heavy applications much easier, due in part to the efficiency of the asset pipeline and Rails’ excellent out-of-the-box support for JSON, consumed by the front-end application.
Front-end frameworks like Ember.js and Angular can be excellent solutions, and work quite well on greenfield Rails applications. However, if you’re building onto a legacy application and need an AJAX-heavy feature, you may not want the cognitive overhead of a heavyweight MVC library like Ember or Angular, to say nothing of the added page weight that libraries like these can add, which may not be worth the overhead if you’re only implementing a small feature set.
In the context of adding a JavaScript UI to a legacy Rails app, Backbone shines. It is lightweight and can provide a cogent and maintainable architecture for your client side JavaScript code.
In this tutorial, we’ll take a look at adding Backbone to an existing Rails application. We’ll start with an extremely simple REST-style application, and look at setting up the Backbone app, basic code organization, and a few gotchas that you’ll run into when integrating Backbone into your Rails app. We’ll also look at how design patterns like the single responsibility principle apply to modern JavaScript architecture.
Step 0: Get the code
I’ve created a repository on GitHub that reflects the application in its starting state, before any of the Backbone code is added. To get it set up, start by cloning the repository.
Note: If you want to follow along step by step, once inside the directory (cd backbone-rails-demo), checkout the step_0 branch (git checkout -b your_branch step_0). That will give you the starting point for this application. If you get confused at any point, stash your changes by running git stash and checkout the branch of the completed next step, such as git checkout step_1. That will give you the code at the next save point that you can compare against yours.
Once you’ve cloned the application and checked out the appropriate branch, run bundle install. From there, you can follow the directions on the README. (If you run into any issues getting your app started, please file an issue and I’ll do my best to get it resolved. Nothing’s more frustrating than not being able to get your app set up!)
Here’s a brief overview of the Rails app: It is a CRUD app for cataloguing a record collection. I’ve created some seed data with some albums for a user. (Load the seed data by running rake db:seed from the directory your app is in.) The seed data is full of classic jazz records.
There are two models in this app: users and albums. You might have already guessed that the relationship between these models is that a user has_many :albums. Go ahead, fire up the application and add a few of your favorite albums.
Here is the feature we’re going to build with Backbone.js: the albums table has a featured boolean column. This way, users can feature their favorite albums of their collections for the world to see. Currently, to unset this field, the user has to go to the edit view for the album. The requested feature is that a user can set the featured flag on their album from the edit page and have it show up in a display box above the table showing all of their albums. This box should display an unordered list of the featured album names, the link should go to the show page for the album, and there should be a button labeled unfeature that will remove the album from the list. If there are no featured albums (such as in the case where the last featured album has been removed from the list), the box should display the text, “There are no featured albums.”
This seems quite simple, but it will take a good bit of code to get this set up. So without further ado, let’s jump in.
Step 1: Add necessary gems to set up Bootstrap.
From the root of your Rails application, open up your Gemfile. Add two gems to the bottom:
The first gem will give us both Backbone.js and its dependency, Underscore.js, vendored for the asset pipeline. (Backbone’s other dependency, jQuery, is already included in the Rails asset pipeline by default.) Underscore is a JavaScript library that adds a lot of great utility methods to the JavaScript core that Backbone uses heavily. We’ll be using its template method in our Backbone Views.
The second gem gives us haml.js, a templating library for our JavaScript templates. haml.js is great because it gives a haml-like syntax for JavaScript templates. However, it’s important to note that this gem isn’t currently under heavy development, so its support for features and bugfixes may be lackluster in the future. However, I tried a number of gems that included templating libraries in writing this tutorial, and this was by far the easiest to get up and running with.
To install the gems, run bundle install. backbone-on-rails also has a custom installer that we’ll run with rails generate backbone:install. Don’t forget to restart your server.
Refresh your application. If a JavaScript alert shows with the text, “Hello from Backbone!”, everything has been installed correctly.
By default, backbone-on-rails names our Backbone app a camel-cased version of the name of our Rails application, which in this case results in BackboneRailsDemo. We’re going to rename it to App to follow the community conventions. We’re also going to remove the code that it placed in the app/assets/backbone_rails_demo.js.coffee file. In the app/assets/application.js file, replace
with
Also, add an App object, where we’ll namespace three of the four major components of Backbone: models, collections, and views. (The fourth is the router, but we’ll talk about that later.)
Calling require self above requires the application.js file, at the bottom of which we’ve placed our global App object. With that object, we’re effectively namespacing our Models, Collections, and Views objects. This will come into play later.
Save this and refresh the page. Open up the JavaScript console, and type Backbone and hit enter. You should see something like the following:
That’s the global Backbone object. We’ll talk about some useful features of that in a bit. Now type App and hit enter. You should see:
REXML could not parse this XML/HTML:
      </script>
Cool. That’s the object we just created in our application.js file. It’s the same object under which we namespaced our models, collections, and views, which you can see inside our object in the console. Lastly, delete the *.jbuilder files that were created by the scaffolding. And that’s the end of step 1.
Step 2: Model Data on the Client
One of my hopes with this article is to show a refactor process, rather than skipping steps to show the end result. To that end, I want to look at building the app in one file so we can see the parts working together, and only then breaking the models, controllers, and other components out into separate files for the sake of maintainability.
Before we write any code, let’s take a second to think about the implementation specifics of our feature. In short, we’re going to be toggling the featured property of our Rails model. This modeling will be mirrored on the client through Backbone: that is to say, we’ll create a Backbone model that is a JavaScript representation of the JSON response our Rails server gives us when we hit the API endpoint. It’ll have all the same attributes. We’re also going to be responding to a user’s click event to set that property, which will be handled by the Backbone view. Our view will then point to a template, in which we’ll place the markup that we want to place in the DOM. Our model will be part of an array of models (rendered as a list), which Backbone considers a collection. This list will have its own view, since we’ll have to do things like display a spinner while the models are loading, and display text that tells the user that there are no featured albums when the list is empty. These will be the responsibility of the collection view.
At the bottom of our application.js file, let’s add the following:
Now we can create the app/assets/javascripts/app.js.coffee file that our application.js manifest is including. In it, let’s begin with our model:
We’ve now created a Backbone model. Like a Rails model, this object will act as a class that will define the attributes we can set and access on instances of that object. As you can see, we’ve placed our Album in the App.Models namespace, which we set up above. If we refresh the page and open the JavaScript console, we can create a new instance of that Album model. Because we haven’t defined the attributes of the model and synced it with the API, we can define arbitrary attributes that we can access and write through Backbone’s getter and setter methods, conveniently named get and set, respectively. Let’s test this in the console:
This is the API we’ll use to set the albums’ featured flag to false through the view. But we’ll get to that.
First, we’ll need to create a collection that will contain the models we’re creating. We’ll also need to give it an API endpoint to tell it where to look for models. One thing that we know for sure is that an AJAX GET request that hits the API should only return the albums for the user whose index page we’re looking at. So let’s modify the API response in the index method of the albums controller.
Great. Now if we create a collection of Backbone albums and point it at that API endpoint, we should get back those albums. Let’s build that collection now.
We’ll just need to tell it which model to use and a URL from which to fetch new records. For now, let’s hardcode that URL to use the user id of the user created by the database seeds.
Now if we go back to the browser and refresh, we should be able to fetch those records from the API we created in the controller by instantiating this collection and using Backbone.Collection’s fetch method:
Okay. We’re definitely making progress. (We’ll come back to making the user id in the url dynamic.) We’ve fetched the albums from the API and can access their attributes. That foreshadows what we’re going to do with our Backbone list view: loop through the models and instantiate their corresponding views, passing in the models, whose attributes we’ll access in our templates, which will in turn render onto the screen.
In the next step, let’s render the list view. This part is pretty complicated, so we’ll break it down into small steps. It also includes some key concepts in Backbone, so I’d recommend reading and re-reading this section before implementing the code. (Note: If anything at all is unclear here, let me know by filing a GitHub issue. Understanding these concepts is key to developing Backbone applications, so if something needs a clearer explanation, that’s a bug!)
Step 3: Rendering the Item View
We’re going to create an element in our albums index view for the list view to render into. For now, it’ll be an empty element. Then, when the JavaScript is evaluated, it’ll populate that element with our model data. So let’s place this above the index table:
Great. Now for the fun part. Let’s create our item view. This view will be in charge of rendering the attributes of the model into the browser, as well as handling any events that happen in its DOM context, such as clicks. (Hang in there, that’s a later step.)
Under the hood, all of these Backbone.[Component].extend calls are constructor functions. Their job, when called, is to create an object. So, we’ll be instantiating our views with the help of these constructor functions.
By default, Backbone views render into a <div> element, but since we know we want an <li> element, we can declare that by calling the view’s tagName method.
Okay. Given a model with attributes, what are we going to want to print onto the screen? Since our data model is an album, let’s start simple by just printing its title. We’re going to need to tell Backbone how to create the markup for our model, given some attributes, and we do this with the template method. We’ll make use of the Underscore library’s own template method, which takes a string with hooks for JavaScript evaluation, and, given a model with some attributes, fills in those dynamic placeholders. Let’s see that in action:
You might recognize that angle bracket syntax from ERB, if you’re used to working with Rails. If you pass an object called myObject with a title attribute, this will evaluate myObject.title. Let’s write a render method for this view that takes a model (which we’ll pass in via the view’s initialize method for now) and place it in this template, given its attributes. In that render call, we’re going to fill in the HTML el of this view. The el is simply the view’s DOM context. (Think of it as the HTML el-ement we’re rendering into.) Into that el, we’ll render the content of this template, to which we’ll pass the model’s attributes (and it will access the title attribute). That looks like this:
Two quick things to note about that render method. That lonely this on the bottom line will compile down to the following JavaScript: return this. Effectively, that will return the item view object, which will allow you to call another of its methods. We’ll see where this comes in handy in a minute.
The second thing is that foreign-looking @$el. This is a CoffeeScript-specific syntax which which is essentially just a jQuery-wrapped version of its el. This will also come in handy shortly.
Now let’s go back to the browser and refresh. We shouldn’t see any errors. In the console, let’s instantiate that view:
There, we can see our view’s $el as well as its el. (Notice, like I mentioned, that the $el is a jQuery object.) But that didn’t change the output on the screen. That’s because we didn’t add it to the DOM. Let’s do that now. We can simply append this li to our ul with an id of ‘featured’. Let’s do this in the console:
When you press return, you should see that li show up in the ul. Exciting! Remember when I mentioned that those two bits would come in a handy? Well, the first one has: we called render() on the view, and since we returned this, meaning the instance of the view we’re working with, we were able to chain the el onto the render() call. And now the el is populated with the contents of our template, which is why there was content in it when we rendered it onto the screen.
We didn’t write a lot of code in this step, but we’re really starting to see the power of Backbone! In our next step, we’ll grab our models from the server and render them into the list view.
Step 4: Rendering the List View
Think of the list view as a container for item views. Indeed, this is reflected in our markup: our list view is a <ul> element, and the items will be rendered as <li> elements.
Let’s create our list view. Since we already have an element into which we’re going to render it, we can declare that explicitly in the view. The el property takes a jQuery selector:
We’re going to instantiate this list view, and it’s going to need access to a collection: our collection of albums. We can think of this view’s render method as looping through the models of the collection, instantiating item views for each of them, passing in their attributes (like we did in the console at the end of the last step), and appending them to the item view’s el. That looks like this:
That bottom line should look familiar: that’s what we just did in the console at the end of the previous step. You may be asking yourself where @collection (or this.collection) came from. Well, we’ll be passing that collection in when we instantiate the list view. Let’s do that using jQuery’s document.ready() method, beautifully abbreviated in CoffeeScript like so: $ ->.
When we instantiate our view, we’ll need to populate it with data from our collection. Let’s instantiate our collection and call Backbone.Collection’s fetch() method, which will retrieve the models from the server at the URL we’ve set for it (found on its corresponding model).
Refresh the page. Huh. Nothing happens! Well, let’s take a look at that App.albums collection by logging it to the console:
Why didn’t anything happen on the screen? Well, we didn’t tell our list view to render! Before we look at why, let’s take a conceptual look at how we’ll be doing that.
You’ll often hear about how Backbone gives structure to your applications. One way it does this is enforcing the principle of information hiding. It shouldn’t be our collection’s responsibility, for example, to render a view. (The more “knowledge” an object has, the harder it becomes to maintain.) In the case of the collection we’ve just fetch()ed, Backbone makes use of the pub/sub design pattern, short for publish-subscribe. When the collection fetch()es the records from the server, it broadcasts, or “publishes” a sync event. We can tune into, or “subscribe” to, this event from our view. This way, Backbone lends itself to a strong separation of concerns: I, as the collection, have just synced. You, as the view, can do whatever you want with that information, but I’ll stay in charge of my domain: organizing my array of models. If you want to render, that’s your business. Because of this, our code will be loosely coupled and easy to change: If we change the URL we’re fetching from or the scope of the models, our view won’t change. Likewise, if we render into another element, or modify our template, our collection won’t change. This is the key to maintainable software.
Now, let’s tell our view to subscribe, or listenTo, the sync event on the collection. When the collection publishes the sync event, we’ll call the view’s render() method. If we think about what will happen when our view renders, we’ll basically be looping through each item view and appending that to the list view, or appending <li>s to the <ul>. One last note: we’re going to place our listenTo call inside of the initialize method so that our view begins to listen when it’s initialized. In order to do this, we have to pass in the collection to which it’s listening to its constructor function. All together, that’ll look like this:
If we delete our initialize method from the model, which was just statically setting the title attribute to “Giant Steps” and refresh, we’ll see a list of the title’s of our albums!
Let’s look at this again, because this communication between objects is central to Backbone development. Starting on the $(document).ready() call, we’re instantiating our list view and passing it the App.albums collection we’ve instantiated on the line above. This will call the initialize method on the list view, which will set it up to listen to the collection. Back at the bottom, when we call App.albums.fetch(), that’ll trigger a sync event (you can see that in the Backbone source here), to which our list view will respond by calling render.
And that’s it! We’re now dynamically rendering our models, which are fetched from the server with an AJAX call, into our view! But shouldn’t we be only grabbing the models that are actually featured? Glad you asked.
Step 5: Scoping the Collection
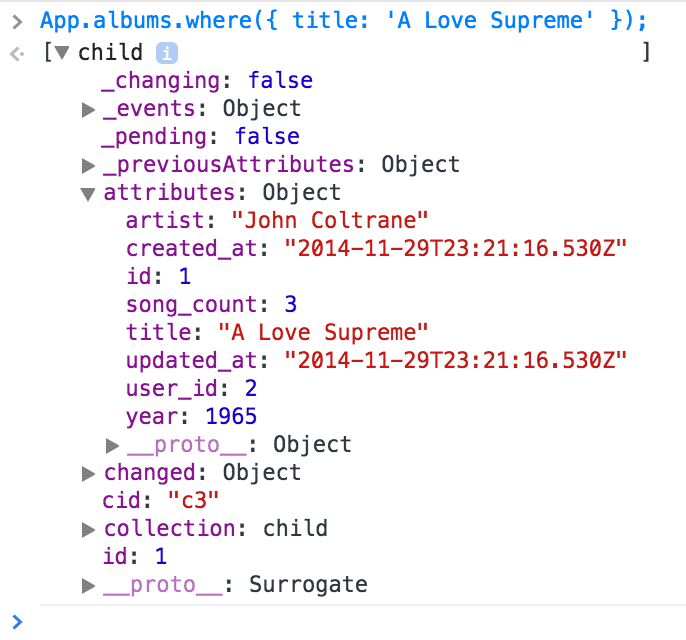
One of the really helpful things about using Backbone with a Rails project is that Backbone provides a familiar API for scoping models. Because Backbone.Collection has a where method that takes a hash, the Rails developer can feel comfortable with a syntax similar to ActiveRecord’s where method. Let’s try this in the console:
And if we click the relevant arrows, we get something like this:
Great. Now we can imagine what it might look like to scope that to the featured albums. But first, we’ll have to go back to our Rails app and create a migration for that attribute.
We’re going to want to add a boolean column to the albums table, and it should default to false. Let’s write the migration for that. I like to use Rails’s migration generator to generate my migrations so they have the correct timestamp. Let’s run rails g migration add_featured_to_albums featured:boolean from the console, then open it in our text editor and add the default value:
Now let’s run rake db:migrate from the console, restart our rails server, and we should be set.
When we go back to the browser, let’s try to find any featured albums:
Empty array. That makes sense, because we defaulted the column to false, and we haven’t set any to featured yet. Let’s do that from the Rails console now:
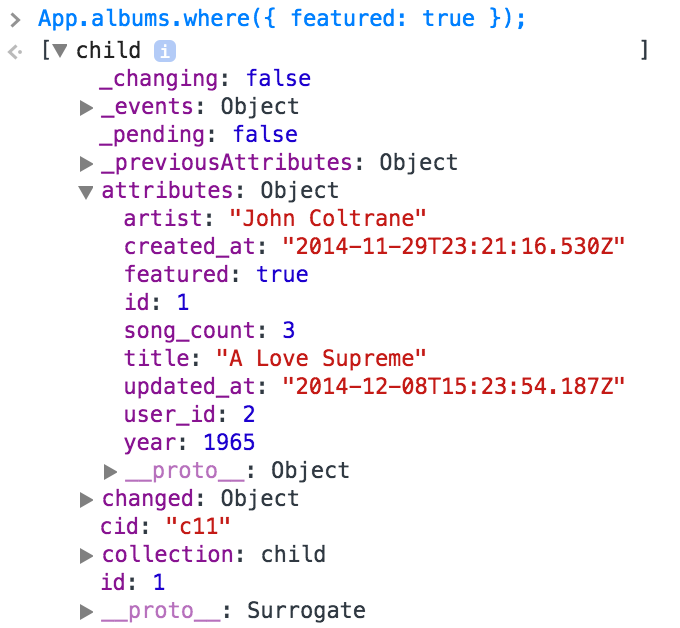
Now if we go back to the browser and run our previous console function, we should get back that first album. And indeed we do:
Great. Now all we need to do is tell our collection to use that scope in our app.js.coffee file. We’ll create a featuredAlbums method on our collection that returns that scope, and then use that in our render function instead of the whole collection:
When I was writing this, I initially forgot to add the parentheses in the render call at @collection.featured(). Without those, the featured method on our collection doesn’t get called, so don’t forget them!
Now let’s refresh the page, and we should see the title of just that one album. Great! That’s the end of step 5.
Step 6: Scope Collections to Current User
Looking at our collection with the hardcoded url for fetching albums reminded me that we need to scope that to our current user. We could write an automated test for that, and we would in the real world, but the focus for this tutorial is to get up and running with Backbone, so let’s test it manually for now.
I’ve been signing in with the admin user created by the seed file: admin@test.com, passw0rd. That user is the User with an id attribute of 2. Since we haven’t placed any authorization rules on the index page for these users (again, not the focus here), we’re currently able to go from http://localhost:3000/users/2/albums to http://localhost:3000/users/1/albums and see the same album title in our featured spot. Definitely not what we want.
We need to tell our collection to get only the featured albums for the current user. In our case, that’s the user with the id of 2. There are a number of ways to do this. When I first wrote the feature for my side project that this tutorial is based on, I implemented this by splitting the URL on the slashes and getting the number: window.location.pathname.split('/')[2]. But that’s a pretty brittle implementation. For example, what if the URL structure changes? When I first refactored the feature, I placed a JavaScript tag at the bottom of the view and hung a variable off of our App object that got the user_id from the params:
This is slightly better, but it unnecessarily places JavaScript in our view, which is avoidable. It also interpolates a Ruby string inside a piece of JavaScript code inside of haml view: nearly every language in our application is colliding here. And while sometimes that can seem useful (and even fun!), that could lead to some unnecessary cognitive overhead down the road. So let’s avoid that here.
I was reviewing a feature at work written by one of my colleagues, and I noticed a clever implementation of a solution to this problem. In the view, he placed the user id in a data attribute on a DOM element, then accessed that from the JavaScript app. This is by far a better solution because it doesn’t mix languages in the view, and it keeps a proper separation of concerns in our app.
Let’s add a data attribute with the user_id from the params to our featured ul in app/views/albums/index.html.haml:
Now we can access that from the url method in our collection:
Now when we refresh, we should see the same featured album, but when we go to http://localhost:3000/users/1/albums, we should see the album list empty.
Summary
In this first part of the Backbone tutorial, we looked at getting Rails set up with Backbone.js and its dependencies and introduced some of Backbone’s modules. We got up and running with a Rails back end providing an API for our front end to consume.
Now onto the exiting stuff! If you’ve made it this far, have a go at part two of the tutorial, where we’ll talk about hamljs templates, handling user interaction, more object oriented programming concepts, and refactoring.